


Great Par 4’s: #9 at Soule Park

I played Soule Park twice recently and I really can’t stop thinking about the ninth hole. I’d love to play it a dozen more times at least. The hole really highlights so much of what I think makes golf great.
When it comes to short par fours, I usually find them a bit boring. Yes, I might be more likely to get a birdie, and sure, getting birdies is fun. Still, when you’re expected to be on the fringe or better off the tee, do we really feel like birdie is an achievement?
I say forget par and think of each hole as if you’re playing a match. Am I debating whether to be aggressive or conservative? If I do attack the hole, is there enough advantage to make a difference? If I fail, do I still have a chance? When a short par four leaves me making different decisions on different days, then it’s dynamic, and that makes golf exciting.
Here I want to look at four attributes make the ninth at Soule Park great:
1. Optionality
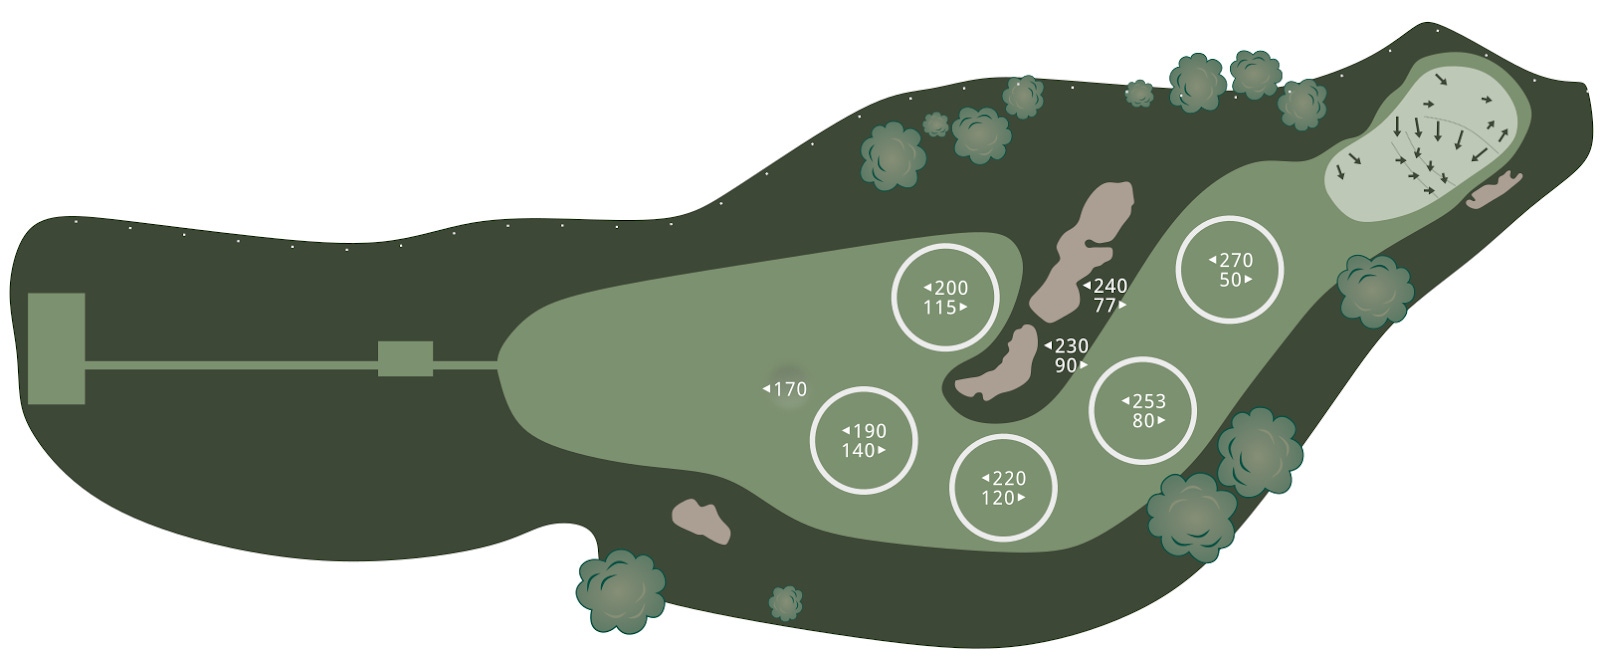
The most obvious thing when I look at this hole is the number of realistic landing zones. As I see it, the central hazard creates at least four distinct targets for me off the tee, and a fifth if I have the wind helping me.
The most obvious landing zone is the right side. This screams safety, as it takes the crossing hazard mostly out of play. However, it also adds a non-trivial amount of distance to the approach.
The more aggressive layup is short left of the crossing hazard. This position significantly reduces the length of the needed drive compared to having a similar approach distance.
A conservative carry over the hazard, right of center.
An aggressive carry over the hazard, left of center.
Finally, there is a full layup short of the hazard. This layup is complicated by a large bump in the fairway, but players who want to avoid as much risk as possible should still play in this area.
Most importantly, however, is the ever present out-of-bounds on the left side. Playing left is never without risk, and while the out-of-bounds is not immediately in play, the aggressive line, left of center, will always be a bit more risky.
2. Temptation
The most obvious temptation on this hole is trying to carry the hazard. The reward is obvious, an incredibly short approach to the green. Successfully carrying the hazard on an aggressive line could even leave players considering a putter. Here, taking on the crossing hazard means playing for birdie instead of grinding out a par. The tradeoffs here are ideal for a finishing hole in a match, and placing it as the ninth serves this function for nine-hole games. (Edit: upon finding some research, the ninth hole was originally the 18th hole as designed by Hanse and Wagner, the course has since rerouted the course. This makes sense from a design perspective exactly for the match play ramifications. It’s a shame that the designed routing was altered.)
On the tee most players will be deciding whether to take on the centerline hazard. While the temptation is to just swing as hard as possible, it is important to remember too much distance is risky, too. Trees behind the fairway could block out players who completely carry the landing zone or miss right.
What really makes the hole tempting is the ability to recover. Ending up in the hazard might mean disaster, but more often than not, it just leaves players with a much more difficult, but makeable shot.
3. Recovery

What I find most fascinating about this hole is that it doesn’t over-punish aggression. Ending up in the fairway bunkers is a setback, but the hazard is close enough that reaching the green it is usually reasonable to recover. The hazard is deep enough to cause worry on the tee, but given the angle to the green, it’s more likely than not that players will be able to hit a full wedge cleanly, with enough loft to get over the lip. With any luck, a heroic recovery is possible. Ending up in the bunker should be a roll of the dice, not guaranteed disaster. Recovery should always be more challenging than playing from the fairway, but should only occasionally be disastrous.
What I find most interesting about the recovery dynamic here is that the hole actually rewards players for being more aggressive. With more aggressive tee shots, even if the player ends up in the hazard, they are still significantly closer to the green than they would have been with a conservative tee shot that is misplayed. The more conservative player will be punished more for the same mistake. Here, fortune favors the bold!
4. Variability
We run into a problem, however, if one of the options that a hole provides is always the best choice. If there are too many benefits to being aggressive, we might always swing for the fences, or if the hazards are too dangerous, we may always lay up. To hold interest, it’s useful for changes in some of the variables on the hole to significantly change the way the hole plays. Here, there are two major variables that affect which path one might choose.
Wind
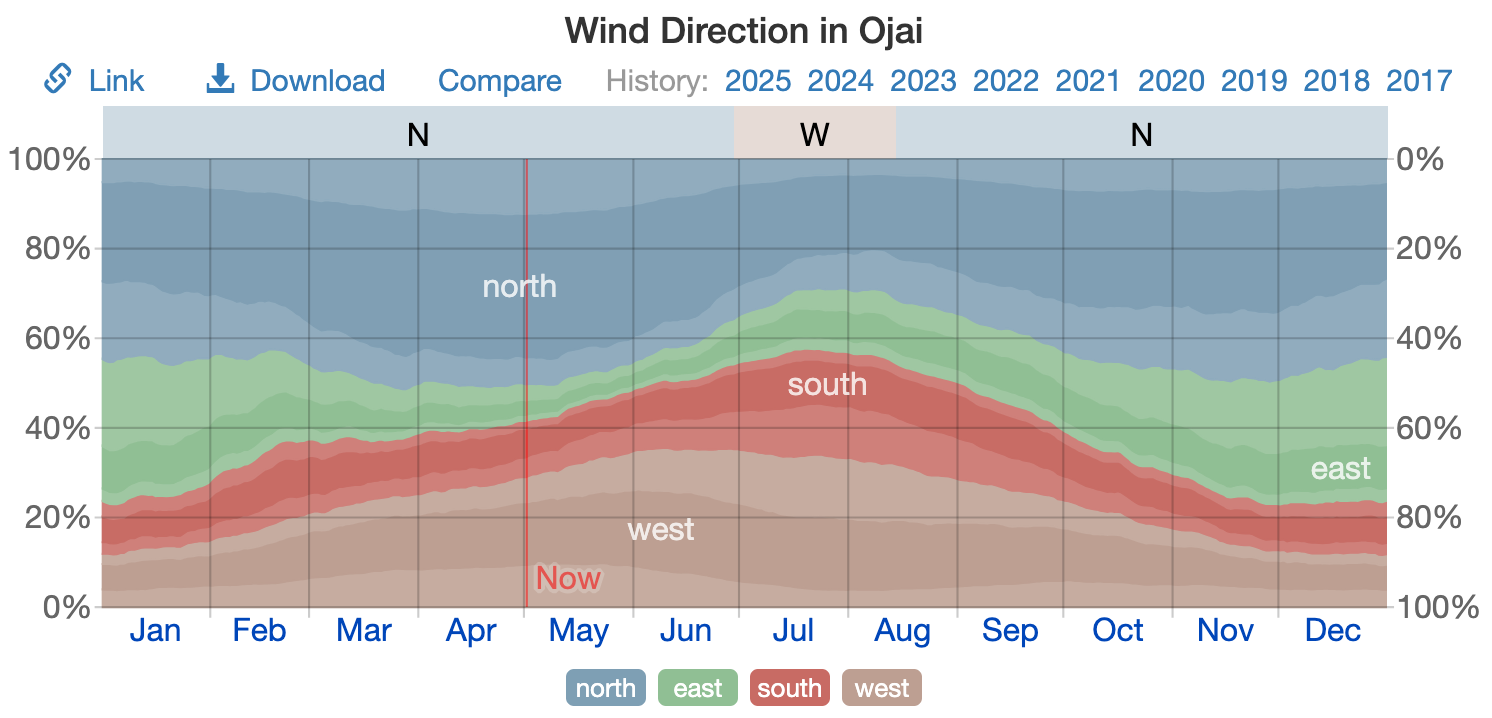
The most common wind pattern here is from the north. This brings uncertainty to how far right the ball may get pushed on the tee shot. This adds risk to playing aggressively and favors a layup, or at least a more conservative play to the right side of the fairway.
The second-most-common wind pattern is from the west. This is a tailwind, which incentivizes an aggressive shot to carry the hazard.
It’s also nice to see that other wind patterns show up in different seasons: an easterly headwind is fairly common in the winter, and in the late summer, wind from the south can push players toward the out-of-bounds.
Dynamic Hole Locations

One of the most important aspects that makes the hole interesting are the large green contours. These contours can definitely bring three-putts into play if the approach misses significantly. The contours aren’t random though. Depending on the angle, they can threaten to push the ball into the greenside bunker. Approaching from the left layup will significantly shorten the distance to the green, but hole locations that are near the bunker will be much more dangerous to attack.

However, when the hole location is in the front (like pins 1 and 2 in the illustrations), it might be worth trying to carry the hazard off the tee. A successful tee shot over the hazard will leave players within 50 yards of the hole, and a good chance at birdie. At the same time, the layup left is also a good option for folks who prefer hitting a full wedge in, because the greenside bunker is completely out of play.

Hole position 3 in the illustration is much more dangerous to approach from the left side. Since everything will kick toward the greenside bunker, laying up to the right side of the fairway has some advantage in allowing an angle that plays against the green contours instead of with them. Here players can use the contours on the green to get it close without risking running off the green.

Finally, there is hole position 4 toward the back of the green. This location will likely require the player to fly it in to get close, but again, there are parts of the green that run away from the shot. This could easily justify trying to carry the central bunker to get as close as possible to get a tight wedge in, but as far right in relation to the green as possible. Here, ending up out-of-bounds is the worst case. After that, ending up too far right, then running off the back. No matter what, it’s going to be very difficult to get close safely.
Short Par Four Done Right
I really think there is a type of successful short par four that is focused on fun. Since the difficulty of distance is missing, players can think about their options, and take the chances they want to take. That doesn’t mean short par fours can’t succeed by being more penal, like the tenth at Riv, just that there is a type of fun par four that offers options and strategy.
When short par fours are simple, they can feel like “must birdie” holes, where it’s more of a par three-and-a-half than a par four. But on the 9th at Soule Park, par is not a given, nor is birdie expected. I think this is where the design of Hanse & Wagner shines, because with all the risk the bunkers and contours present, a birdie must be earned. What the short design does do is compress higher scores: easy bogey, straightforward par, challenging birdie.
Mostly what I like about it, though, is that while advantages can be gained on each shot, you could never concede the hole early. A player in the bunker could easily get on the green, and perhaps in a better position than a player who has an ideal approach. It’s a high variance hole, but with a low skill threshold to compete. It invites people to take a risk, in a game where playing it safe is far too common.